PSK (Pre-Shared Key) Authentication
In this lesson we’re going to be taking a look at PSK (Pre-Shared Key) authentication and how we can configure and verify this on our WLC (Wireless LAN Controller).
Exam Topic
5.0 Security
5.4 Configure and verify wireless security features
5.4.c PSK
Video Overview
Overview
PSK authentication is used to secure wireless connections on a wireless LAN. It achieves this by using a key string that authenticates the client connecting. The PSK works by having all nodes required as part of the wireless LAN design to be configured with the same PSK.
In order to operate, PSK utilizes one of 3 versions of WPA (Wi-Fi Protected Access).
WPA is a wireless security standard created by the Wi-Fi Alliance.
WPA1
This was a replacement for an older security standard used for wireless called WEP (Wired Equivalent Privacy). The WPA1 standard is considered extremely vulnerable and should not be used.
WPA2
WPA1 was superseded by WPA2. This version of the standard introduced increased encryption mechanisms over the previous standard and aimed to provide better security.
Although WPA2 is considered more secure than the previous WPA1 standard, there were a number of vulnerabilities discovered.
One of the main vulnerabilities discovered in the WPA2 standard was known as ‘KRACKs’ which allowed malicious users to intercept and read traffic transmitted within the wireless LAN
WPA3
Due to the vulnerabilities discovered as part of WPA2, the Wi-Fi Alliance announced WPA3. This improved standard was introduced to improve the overall security of the standard.
It’s worth noting that all three standards can still be used within wireless networks, however it’s strongly advised to only use WPA3 wherever possible.
WPA itself can operate in two modes – both of which are available on all WPA standards:
During this lesson we’re going to be focusing on WPA-Personal which is used when using PSK authentication with our wireless LAN.
Benefits
There are some great benefits to using PSK authentication within your wireless network, these include:
When we get into the configuration shortly you see just how easy it is to setup and get running with PSK authentication. This is one of the drivers for PSK authentication as we only need to rely on the users knowing the key string to authenticate to the wireless network.
PSK authentication has become extremely popular for both enterprises and personal settings. As such, end users have become extremely familiar with the process of authenticating to a wireless network – as long as they’ve got the PSK to authenticate.
Due to its simplicity, PSK offers a great alternative to authenticate devices unable to utilize 802.1X authentication. Printers and legacy network devices are great examples of appliances that we sometimes have difficulty authenticating to a WPA-Enterprise network.
Disadvantages
Unfortunately, even though PSK authentication offers some fantastic benefits. There are unfortunately some downsides.
Our PSK key-string that we decide to use must be configured identically on all devices authenticating to the network. Take for example our PSK key-string is ‘MixedNetworks123!’. This key would need to be entered on every device that authenticates
to our network. All it takes is for our key-string to be compromised and we’ve lost control of who can access the network.
NOTE: Cisco have released an alternative to this known as iPSK (Identity Pre-Shared Key). This feature is used in conjunction with Cisco ISE that allows you to present a single SSID, however
allows us to have more than 1 PSK key-string in order to segment devices into separate networks – depending on the key-string used to authenticate.
As this isn’t included in the CCNP ENCOR (350-401) exam, we won’t be discussing iPSK in this lesson.
the wireless LAN, it’s important that the key-string is changed often. This prevents the key from being compromised and unauthorized devices connecting to the network.
The problem with changing the PSK key-string often is that we have to re-enter the new PSK key-string to authenticate the client once it’s been changed. This could be a huge handful, depending on the number of devices authenticating.
Due to all devices authenticating to the wireless LAN using the same PSK key-string, it makes it extremely challenging to identify which users and devices are connected. Because of this we cannot see directly who’s authenticated to the network using which device.
Configuration
Now we understand PSK authentication, lets take a look at how we can configure it on our wireless LAN controller.
To complete the configuration we’ll start off by taking a look at how we can complete this via the web GUI. Following this, we’ll just over to our CLI and go through it again.
WEB GUI – PSK Authentication Configuration

We’ll start off by logging into our WLC and going into the advanced configuration.

From here, we need to navigate to WLANs and create our wireless network (SSID).

Once we’ve completed the information and press apply, we can then amend the configuration for our WLAN.
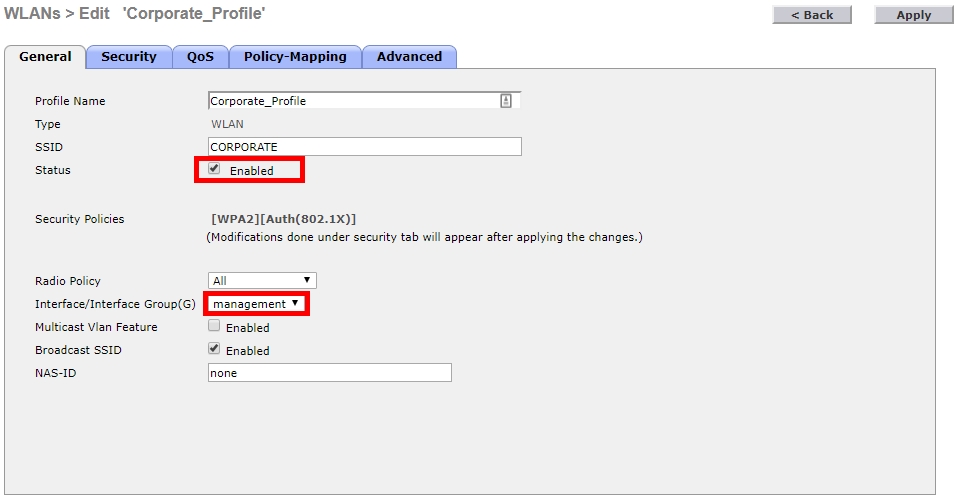
We’ll start off by enabling our SSID as by default it’s disabled. Along with this, it’s important that we select the correct interface for our WLAN to use.
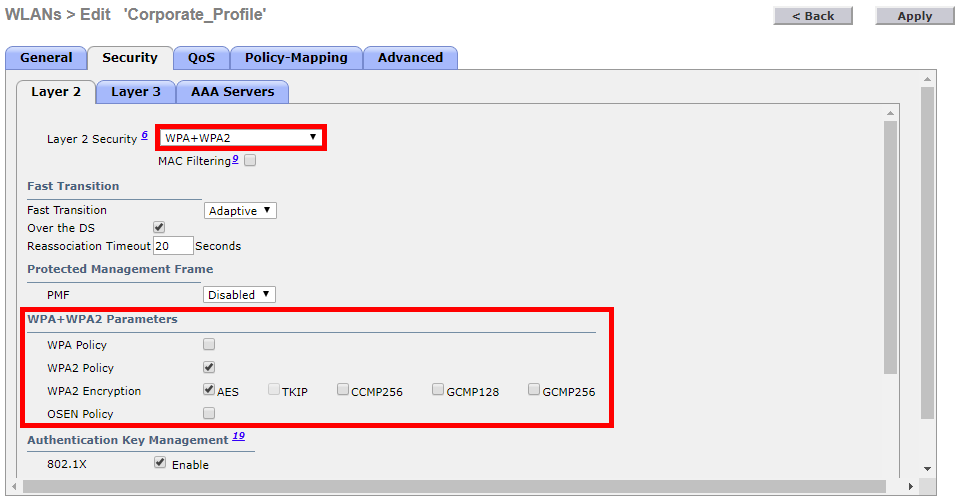
Once completed, we’ll head over to the security tab and configure our PSK authentication.
First of all, under Layer 2 Security we’ll select WPA+WPA2.
NOTE: The controller used for this example doesn’t support WPA3, if WPA3 is supported on the controller is shown as ‘WPA2+WPA3’ in the drop down.
Under WPA+WPA2 Parameters we’ll keep the defaults selected. These are WPA2 Policy and AES Encryption.
NOTE: If WPA3 is supported on the controller, we’d have the option to enable WPA3.
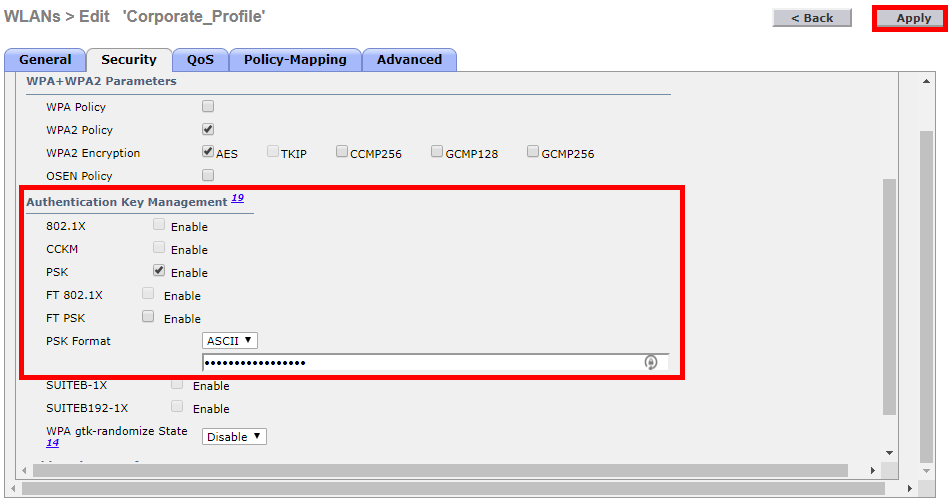
Next, we need to disabled 802.1X and enable PSK. The final step is to then configure a key-string, in this example I’ll use MixedNetworks123!
NOTE: It’s advised to use a strong key in production environments.
We’ve now completed all of the required configuration for PSK authentication. As such, we’ll apply the configuration at the top right of the page and the save the configuration to the controller.
WEB GUI – PSK Authentication Verification
The final thing for us to complete is to confirm our configuration is working. We can do this in two ways:
We’ll start off by checking the security policy of our WLAN profile. To do this, head to the WLAN tab again on the WLC and find the WLAN we created.

You can see here under Security Policies our WLAN is configured to use WPA2 and PSK authentication.
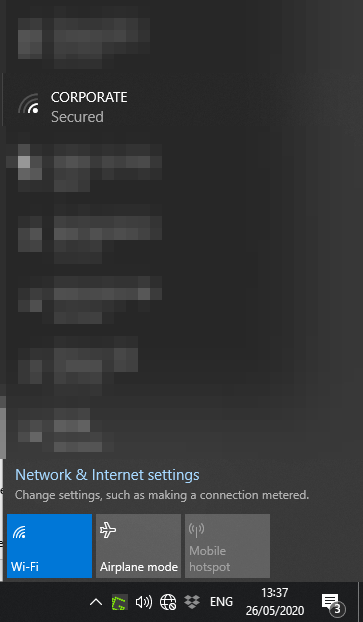
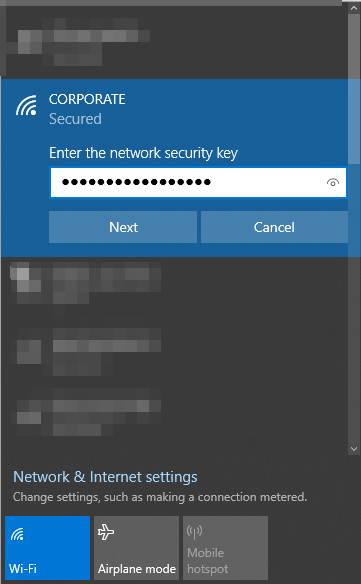
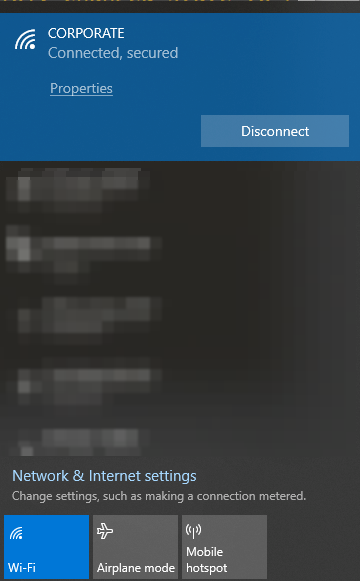
An alternative method of verifying our PSK WLAN is to physically connect to it.
CLI – PSK Authentication Configuration
To start the configuration, we’ll SSH to our WLC and login our credentials.

(Cisco Controller)>config wlan create 1 CORP_PROFILE CORPORATE
(Cisco Controller)>config wlan broadcast-ssid enable 1
(Cisco Controller)>config wlan interface 1 management
(Cisco Controller)>config wlan security wpa akm 802.1x disable 1
(Cisco Controller)>config wlan security wpa akm psk enable 1
(Cisco Controller)>config wlan security wpa wpa2 ciphers aes enable 1
(Cisco Controller)>config wlan security wpa akm psk set-key ascii MixedNetworks123! 1
(Cisco Controller)>config wlan enable 1
CLI – PSK Authentication Configuration
(Cisco Controller)>grep include PSK “show wlan 1”
Press any key to continue..
PSK………………………………. Enabled
FT-PSK(802.11r)……………………. Disabled
PMF-PSK(802.11w)…………………… Disabled
There are 3 lines matching the pattern PSK